
How to Program a Chamberlain Garage Door Remote
To program a Chamberlain garage door remote, press and release the Learn button on the opener, then press the button on your remote until the opener lights flash or you hear a click. Most Chamberlain remotes pair in less than a minute when the remote battery is good and the opener is compatible.
If the remote will not pair, check the battery, opener memory, Learn button color, antenna wire, wall control lock setting, and remote compatibility. If the wall button works but the remote still will not connect, the problem may be with the remote, receiver, antenna, or opener logic board.
Door Doctor can help if your Chamberlain remote, keypad, or opener will not respond after troubleshooting. A technician can inspect the opener and confirm whether you need remote programming, garage door opener repair, or replacement.
Quick Steps to Program a Chamberlain Garage Door Remote
- Locate the Learn button on the Chamberlain opener motor unit.
- Press and release the Learn button.
- Within 30 seconds, press and hold the button on the remote.
- Wait for the opener light to flash or for the opener to click.
- Release the remote button.
- Test the remote from a safe distance.
Chamberlain’s programming guidance also uses the Learn button process, with the opener giving about 30 seconds to press the remote button before programming mode times out. The opener lights may blink or the unit may click when the remote has been programmed successfully.
Quick Troubleshooting Guide
| Problem | What It Usually Means | What to Try |
|---|---|---|
| Remote will not pair | Weak battery, compatibility issue, or opener memory issue | Replace the battery, confirm remote compatibility, and repeat programming |
| Learn button does not light up | Power issue, opener issue, or lock setting | Check power, unplug and reconnect the opener, and check the wall control |
| Opener light flashes but door does not move | Door, sensor, or opener issue | Check safety sensors, door path, and wall button operation |
| Wall button works but remote does not | Remote, antenna, receiver, or logic board issue | Try another remote, check the antenna wire, and schedule opener service |
| Remote only works close to the door | Weak signal or antenna issue | Replace the battery and check the antenna wire |
| Lost all remotes | Old remotes may still be stored in memory | Erase opener memory and reprogram trusted remotes |
If the wall button works but the Chamberlain remote will not pair, Door Doctor can inspect the opener, antenna, receiver, wall control, safety sensors, and logic board. Schedule garage door opener repair before replacing the entire opener.
Before You Start
Before programming a Chamberlain garage door remote, make sure the opener has power and the garage door is clear of people, pets, vehicles, and stored items. Stand where you can see the door while testing the remote.
You should also check the remote battery. A weak battery can make the remote fail during programming or work only when you are standing close to the opener. If the remote is old, damaged, or has been dropped, the remote itself may be the issue.
If you bought a replacement remote, confirm that it is compatible with your Chamberlain opener. The Learn button color and opener technology help determine which remotes will work with your system.
How to Find the Learn Button on a Chamberlain Garage Door Opener
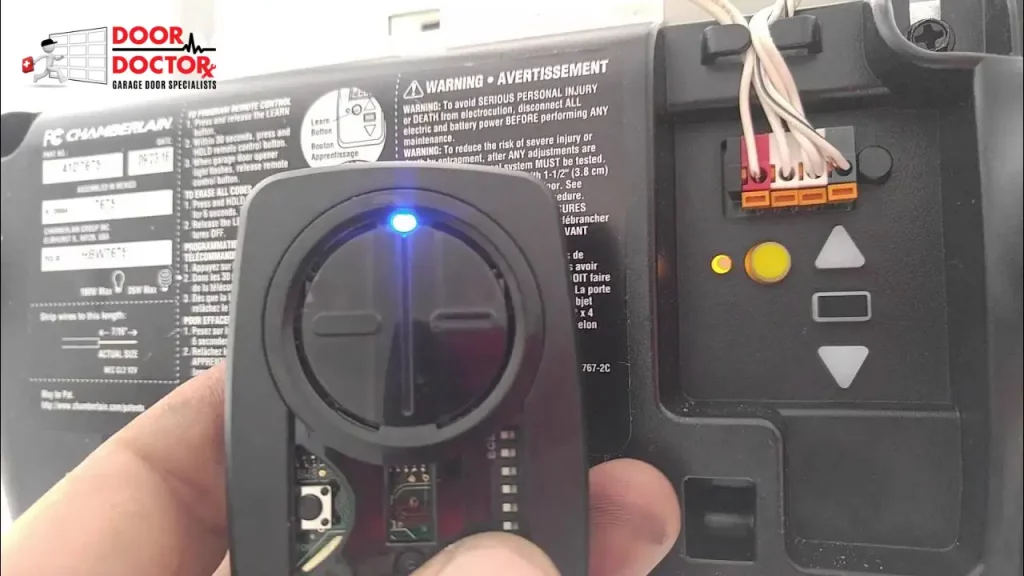
The Learn button is usually located on the back or side of the opener motor unit near the antenna wire. On some models, you may need to remove or open the light cover to see it.
The Learn button may be yellow, purple, red, orange, or green. The color matters because it helps identify the opener’s technology and remote compatibility.
If you cannot find the Learn button, look for the model number label on the opener motor housing. The label may be on the back, side, or near the light cover. The model number can help you find the right manual or confirm which remote should work with the opener.
Chamberlain Learn Button Colors
| Learn Button Color | Common Technology | What It Means |
|---|---|---|
| Yellow | Security+ 2.0 | Common on newer Chamberlain openers |
| Purple | 315 MHz Security+ | Common on many older Chamberlain openers |
| Red or Orange | 390 MHz Security+ | Older Chamberlain opener technology |
| Green | Older Chamberlain systems | Older opener models may need different remotes |
The Learn button matters because it affects remote compatibility. If the remote does not match the opener’s technology, it may not program even if the steps are done correctly.
How to Program a Chamberlain Remote
Programming a Chamberlain garage door opener is usually straightforward when you have a compatible remote and access to the Learn button on the motor unit. The exact steps depend on whether you are programming a standard handheld remote, a universal remote, a vehicle system such as HomeLink, or a keypad.
Below are the main ways to program a Chamberlain opener, including a handheld remote, universal remote, vehicle HomeLink system, or keypad.
Standard Handheld Remote Programming
Most Chamberlain handheld remotes are programmed from the opener motor unit. This is the standard method for replacing a lost remote, adding a new remote, or setting up an extra button on a multi-button remote.
Locate the Learn button on the opener motor unit. Press and release the Learn button. The indicator light should turn on, which means the opener is ready to learn a new remote signal.
Within 30 seconds, press and hold the button on the remote that you want to use. Keep holding the button until the opener light flashes or you hear two clicks. Release the remote button, then test it from a safe distance.
If the opener does not respond, repeat the steps. Make sure you are close enough to the motor unit, the remote battery is fresh, and the remote is compatible with your opener.
A steady light usually means the opener is ready to learn a new signal. A flashing light after pressing the remote usually means the programming worked. If the light does not flash, the signal may not have been stored.
Most Chamberlain openers can store multiple remotes at the same time. Depending on the model, you may be able to program several handheld remotes along with a keypad and vehicle system.
Universal Remote Programming
If you do not have the original Chamberlain remote, a compatible universal remote may also work with your opener. Before buying one, check that the remote lists Chamberlain compatibility and supports your opener’s Learn button color.
To program a universal remote, locate the Learn button on your Chamberlain opener and press it once. Within 30 seconds, press and hold the button on the universal remote you want to use.
Wait for the opener light to blink or for a clicking sound, which usually means the remote has been programmed. Test the universal remote from a safe distance to confirm the door responds.
Always match the universal remote to your opener’s frequency and Learn button color. If your universal remote has dip switches, mode settings, or brand selection steps, follow the remote’s manual before programming it to the opener.
Some universal remotes can control more than one garage door opener, making them a practical option for homes with multiple garage doors.
Programming a Vehicle’s Built-In System, HomeLink or Car2U
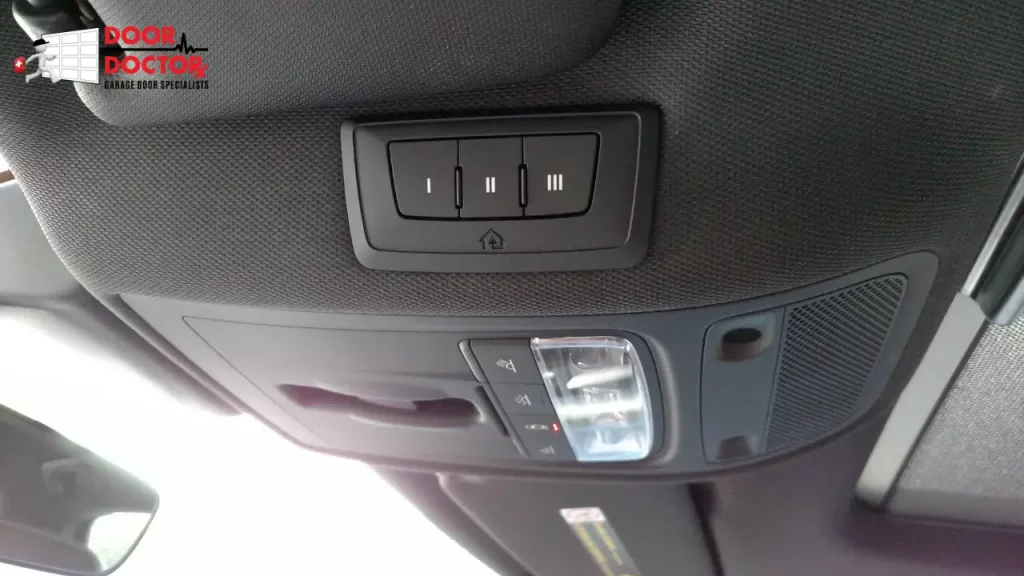
Many newer vehicles have built-in garage door buttons through HomeLink or Car2U. These buttons are usually located on the sun visor, rearview mirror, or overhead console. They allow you to control your garage door without carrying a separate remote.
Start by clearing old codes in the vehicle system if needed. Hold down the two outside buttons on the HomeLink or Car2U panel until the indicator light starts blinking rapidly. This erases previously stored codes.
Next, hold your Chamberlain remote a few inches away from the vehicle’s control panel. Press and hold the Chamberlain remote button while also holding down the in-car button you want to program. The indicator light may blink slowly at first, then faster. When it blinks rapidly, the signal has usually been captured.
Then press and release the Learn button on your Chamberlain motor unit. Within 30 seconds, return to your vehicle and press the programmed HomeLink or Car2U button. You may need to press it two or three times, holding for about two seconds each time.
The garage door opener should click, flash its light, or move the door once the connection is complete.
If the garage door does not respond, make sure the Chamberlain remote you used to train the vehicle has a working battery. For rolling code models, timing matters. Press the Learn button and return to the vehicle quickly to complete the sync.
Some vehicles require more than one press of the programmed button before the opener accepts the code. If HomeLink or Car2U still does not connect, check the vehicle manual, remote battery, opener compatibility, and Chamberlain support.
How to Program a Chamberlain Keypad
A Chamberlain keypad lets you open the garage door with a PIN instead of a handheld remote. The exact steps may vary by keypad model, so check the keypad instructions if the basic method does not work.
In most cases, start by pressing and releasing the Learn button on the opener motor unit. Then enter your chosen PIN on the keypad and press the enter button. The opener light may flash or the unit may click when the keypad has been accepted.
Test the keypad after programming. If it does not work, check the keypad battery, confirm the PIN was entered correctly, and make sure the keypad is compatible with the opener.
How to Erase Old Chamberlain Remote Codes
If you lost a remote or moved into a home with an existing opener, erase the old remote codes before programming a new remote. This helps prevent old remotes from opening your garage door.
To erase remote and keypad access, locate the Learn button on the opener. Press and hold the Learn button until the LED turns off, which usually takes about 6 seconds. This clears previous remote and keypad codes from the opener memory, and each remote or keypad must be reprogrammed afterward.
After the memory is cleared, reprogram each remote, keypad, or vehicle system you still want to use.
Why Your Chamberlain Remote Will Not Program
If your Chamberlain remote will not program, start with the simple issues first. Replace the remote battery, stand closer to the opener motor unit, and make sure you press the remote button within 30 seconds after pressing the Learn button.
Compatibility is another common issue. A remote made for one Learn button color or technology may not work with a different Chamberlain opener. If the remote is universal, check the instructions to make sure it is set to the correct mode.
The opener itself can also be the problem. If the wall button works but the remote does not, the issue may involve the remote, antenna wire, receiver, or logic board. If neither the wall button nor the remote works, the opener, door, sensors, or power supply may need service.
Learn Button Does Not Respond
If the Learn button does not light up or respond, make sure the opener is plugged in and receiving power. You can also unplug the opener for about 30 seconds, plug it back in, and try again.
Check the wall control for a lock or vacation setting. Some wall controls can temporarily disable remote operation. If lock mode is on, the remote may not work even if it was previously programmed.
If the Learn button still does not respond, the opener may have an internal issue. A technician can inspect the opener, circuit board, receiver, and wiring.
Remote Seems Programmed but the Door Does Not Move
Sometimes the opener light flashes or the unit clicks, but the garage door still does not move. This may mean the remote was accepted, but the opener or door system has another problem.
Check that the opener is connected to the door, the safety sensors are aligned, and nothing is blocking the door path. Also check whether the door moves normally with the wall button.
If the wall button works but the remote does not, repeat the remote programming steps. If the problem continues, the remote signal, antenna, receiver, or logic board may need inspection.
Remote Only Works Close to the Garage Door
If the remote works only when you are close to the garage door, the issue is often signal related. Replace the remote battery first because a weak battery can reduce range.
Next, check the antenna wire hanging from the opener motor unit. It should be visible and not damaged, tucked away, or wrapped around other parts.
Nearby electronics, LED bulbs, or signal interference can also affect remote range. If the range remains poor after replacing the battery and checking the antenna, the opener may need professional troubleshooting.
When the Problem Is the Garage Door Opener
Not every remote issue is caused by the remote. If the opener hums, clicks, struggles, reverses, or does not move the door, the problem may be with the opener or the garage door system.
A heavy or unbalanced door can strain the opener. Bad springs, worn rollers, bent tracks, damaged sensors, or a failing logic board can all make the opener act like the remote is the problem.
If your remote will not pair and the door is also noisy, uneven, or unreliable, schedule garage door opener repair or garage door repair before replacing the remote.
Safety Tips When Programming a Chamberlain Remote
Keep children and pets away from the garage door while you program or test the remote. Stand where you can see the door, and do not walk under a moving garage door.
Do not keep pressing the remote if the door starts moving unevenly, reverses suddenly, or makes grinding sounds. Stop testing and inspect the door area.
If a remote was lost or stolen, erase old codes from the opener memory before adding a new remote. This helps keep your garage secure.
Maintenance Tips for Chamberlain Remotes
Replace the remote battery when the range gets weaker or the remote becomes inconsistent. Many homeowners replace remote batteries once a year as a simple maintenance habit.
Keep spare remotes away from children, vehicles you no longer use, and people who should not have access to the garage. If you move into a new home, erase the opener memory and program only the remotes and keypads you trust.
Test the safety sensors regularly. If the garage door does not reverse when the sensor beam is blocked, the opener should be inspected before regular use continues.
Need Help With Chamberlain Garage Door Opener Repair?
If your Chamberlain remote will not pair after you replace the battery, check compatibility, and repeat the programming steps, the opener may need service. Door Doctor can inspect the remote, wall control, opener antenna, safety sensors, receiver, and logic board.
This is especially important if the wall button works but the remote does not, the remote only works from very close range, or the opener light flashes but the door does not move. In those cases, opener repair may be a better first step than buying another remote.
Need help with a Chamberlain remote, keypad, or opener that will not respond? Contact Door Doctor for garage door opener repair, garage door opener installation, and garage door troubleshooting service.
Chamberlain Remote Programming FAQs
Final Recommendation
Programming a Chamberlain garage door remote is usually simple when the remote is compatible and the opener is working correctly. Press and release the Learn button, press the remote button within 30 seconds, and wait for the opener light to flash or click.
If the remote still will not pair, do not keep replacing remotes without checking the opener. The issue may be the antenna, receiver, wall control, safety sensors, logic board, or garage door system. Door Doctor can help diagnose the problem and recommend the right repair or replacement option.